
Discover The Stories StoryTerrace Help Share.
Explore inspiring stories, expert tips, and the latest trends in personal biography creation on our blog.
.png)
.png)
The Magic of Sharing Stories This Season
The most meaningful gifts don’t come wrapped; they come remembered.
.png)
Immigrant Experience-Based Bestseller: A Taiwanese Immigrant’s Journey to Kansas City by Benny “Goodman” Lee
We are proud to celebrate another StoryTerrace bestseller! From a childhood in Taiwan to a thriving life in the heart of America, Benny Lee’s story is a remarkable testament to resilience, entrepreneurship, and the power of giving back.
.jpg)
Inside the StoryTerrace Interviews
At StoryTerrace, every book begins with a conversation. Interviews are at the heart of what we do. To give you a peek behind the curtain, we sat down with Stefanie Fox, one of our Premium Writers. Stefanie shared her perspective on what makes an interview not just informative, but transformative.
%20(27).png)
Is This the Most Meaningful Gift of the Season?
As the holiday season approaches, the quest to find the perfect gift for loved ones without a wish list is just around the corner. But don't worry, we are here to lend a hand with some ideas that are meaningful, memorable, and delightfully unique!
%20(25).png)
StoryTerrace Spotlight: White Coat, Blue Gown by the late Dr. Barbara Tatham
We’re proud to feature White Coat, Blue Gown by the late Dr. Barbara Tatham, Family and Emergency Room Physician at London Health Centre, Toronto as our September Book of the Month.
Browse all articles
How To Digitise Your Photos
Your book needs some images to break up the writing. But how will you digitise your photos from those old albums? Find out how to get the best results here.
This is the sixth part of our 'Ultimate Guide to Writing a Memoir.'
To access the rest of the guide, click here.
Want to break up your writing and add an element of visual context with old photographs? Here’s where you’ll learn how to successfully scan your images onto your computer in a quality you’ll be happy to include in your book.
There are a few different ways you can digitise your photos, each with their own set of pros and cons.
1. Don't just use your smartphone camera.
The quickest and easiest method of digitising photos is to snap your prints using your smartphone. This may be efficient, but results will be mediocre at best. Most smartphones use flash, and most photographs are glossy. This doesn’t make for a perfect match, and your images will capture the glare of the flash, or - even better - your reflection. Even if you can work around this problem, your images will not be properly cropped, may be distorted, and are likely to be low-resolution and poor quality.


2. Use a dedicated scanning app.
You can do slightly better with your smartphone, if you use an app dedicated to scanning prints. One app that stands out from the rest is Google’s free PhotoScan app. All you need to do is position your smartphone over the photograph, and the app does the rest.
You’ll see four dots appear on the image, which will inform where you position the camera for the scan. With almost as little effort as just using your smartphone’s camera, this app eliminates glare and automatically crops your image to the borders of the photograph.
Each scan takes roughly 10 seconds. However, the quality still leaves a lot to be desired, when compared to a purpose-built scanner.
3. Use a scanner.
If you have your own scanner, or you can source one from a friend or family member - great! Simply put the photographs you want to digitise through the scanner (depending on whether you’re using an auto feed or flatbed scanner) and wait whilst the images are processed. Using a scanner can be time-consuming and fiddly. Make sure there’s no dust on your photographs or the scanner bed - you don’t want that in your book!
If you want to reproduce your photographs at the same size as the original prints, you’ll need to scan at a minimum of 300 dpi. Your photos will need to be scanned at 600 dpi to print double the size, and so on. 600 dpi is recommended, otherwise they’re going to look pixelated and blurry. No matter how high quality the scan, if the image itself is blurry or lacking in detail, you may still be disappointed by the results. In this instance, you can have the photo altered in Photoshop, but there are limits. It’s also a good idea to caption your images, so readers know who is in them, and when and where they were taken.
4. Get professional help (recommended)!
If you’re pressed for time and short of patience, or if none of the alternatives are an option, there are several companies that provide photo scanning services. All you need to do is send your photos, and they’ll do the work for you - for a fee, of course!
Read Chapter 7: Designing and Printing Your Book

Writing a Memoir: An Overview
A summary of key takeaways from our ultimate guide to writing a memoir.
1. Organising your memories: Key points to remember
It’s important to gather all your information before you start writing, so you can plan your story and know what you’re going to talk about.
- Use our memory prompts to recall forgotten information about your life.
- Record your information in an organised format so you can easily decide what to include in your memoir. We suggest using our timeline.
2. Structure your life story: Key points to remember
There are many different ways to structure your story, and you don’t have to write chronologically. Here’s a quick overview of the methods we go through in Chapter 2:
- The chronological approach: start at the beginning, and tell it how it happened step-by-step.
- The basic three acts: split your narrative into the setup, the confrontation, and the resolution.
- Freytag’s pyramid: slightly more complex than the basic three, Freytag’s pyramid consists of five stages. These are the exposition, rising action, climax, falling action, and resolution.
- In media res: starts in the middle of the story, right at the height of the action.
- The hero’s journey: this is one of the most popular methods of storytelling. It’s quite complicated, so take a look back through Chapter 2 to find out more.
3. Writing (the nitty gritty!): Key points to remember
This chapter covers two key areas: finding the time to create a habit out of writing, and developing your own unique style.
- Set S.M.A.R.T (Specific, Measurable, Attainable, Relevant, and Timely) goals to structure your writing habit efficiently.
- Your writing needs to sound like it’s something you would say. Get feedback to make sure your writing “sounds like you”.
- Think about the books you like to read. If you aren’t engaged with your story, it’s unlikely anyone else will be.
- Be honest with yourself. Who are you writing a memoir for? You need to keep your audience in mind at all times when writing. Is this something they are going to want to read?
4. Overcoming writer's block: Key points to remember
Writer’s block can affect anyone - it’s a popular name for that moment when you are in the midst of a project, but you lack the inspiration or drive to write another word. Here are some ways to overcome writer’s block:
- Take a break: Read a book or draw a picture. Go for a run. Do anything that will take your mind off writing, and then go back to it feeling fresh.
- Change your environment: if you’re used to writing at your uncomfortable, dimly lit desk at home, why not try seeking inspiration elsewhere? Go to a local coffee shop or library.
- Free write: set a timer or a word limit and write anything. Forget about grammar or plot or structure. Just write.
5. Editing and proofreading your book: Key points to remember
Editing involves making sure your ideas are expressed logically, in a clear and coherent narrative.
- Read through your written memoir from start to finish before you make any major editing decisions. When you’ve done that, some questions you might want to ask yourself as you edit, are:
- Does the text make sense?
- Is every sentence relevant to the purpose of the text?
- Does each paragraph contain one idea?
- It is important to ask a trusted friend, family member or even a professional editor to provide feedback. They could point out a fundamental error that you might have missed, or amend part of a story you remembered incorrectly.
Proofreading comes after the editing process, and is more about language. It involves checking over spelling, punctuation and grammatical errors, as well as format.
- Make a list of common mistakes to look out for within your text. If you often misspell specific words, jot them down and keep an eye out whilst you proofread.
- Read out loud to spot errors and run-on sentences that reading silently risks missing.
6. Digitising your photos: Key points to remember
There are a few different ways you can digitise your photos, each with their own set of pros and cons.
- Using a smartphone: this is quick and easy, but the results are adequate at best.
- Using a dedicated scanning app: Google’s free PhotoScan app is better than a smartphone’s camera, but still leaves a lot to be desired.
- Using a scanner: if you or a friend owns a scanner - great! Scanners produce great results, but the process is very laborious and time-consuming.
- Get professional help: this is the best and most reliable way to digitise your photos. If you don’t have access to any of the other options, there are plenty of companies that offer scanning services that will digitise your photos. All you need to do is send them in.
7. Designing and printing your book: Key points to remember
We recommend you leave a lot of the design process to the professionals. If you would like to have a go yourself, here’s what you need to think about:
- What typeface do you want to use? Serif or sans serif?
- What size book do you want to end up with? A5? A4? Square?
- How many photos do you want to include?
- How many copies do you want to order?
- Hardcover or softcover? Full colour or black and white?
- How much will shipping cost?
8. How to make your book cover stand out: Key points to remember
Designing your book cover is an important part of the design process when it comes to writing a memoir. Again, we would advise that you consult a professional designer, but we’ve provided some tips and common themes within book cover design if you want to have a go yourself.
- Keep it simple: your cover doesn’t have to be extravagant, just eye-catching. Use relatable imagery or clever typography to draw potential readers in.
- Use photography: if you’re unfamiliar with design software, why not experiment with a camera?
- Design for your genre: whether or not the theme of your memoir is romance or thriller, or entirely unique, there are certain thematic structures you can use so the audience knows what to expect. For example, book covers for romantic stories tend to depict a couple and use muted pastels.
We can help!
If this all seems like an awful lot of hard work, that’s because it is! But don’t worry. This is where we come in.
Story Terrace is revolutionising the way we think about our heritage with a simple idea: a biographer for every person. We match you with a carefully chosen professional writer, who will conduct in-depth interviews and ultimately, write your story. Your beautiful, hardcover, full-colour books will be delivered to your door, and you don’t need to worry about a thing - because we’ve got you covered!
Whether you’re looking for a writer, or you just need a little help editing - contact Story Terrace for more information about how we can help with your story today.

How To Make Your Book Cover Stand Out
You shouldn't judge a book by its cover. You shouldn't, but you do. Find out how to make your book cover stand out with these useful tips.
You shouldn’t judge a book by its cover. You shouldn't. But you do.
As well as catching your reader's eye, your book cover should reveal something about your story. The tone of your cover should match the tone of your book.
So how do you make your book cover stand out?
Keep it simple.
Find one component within your story to focus on visually for your book cover. Don’t try and illustrate the whole story in a single picture.
Equally, simple book covers translate better into thumbnails. This design on Bad Teeth, written by Dustin Long, translates especially well into a thumbnail because the books in the image, combined with the used, look - the title suggests - like bad teeth.

Be relatable.
Using familiar imagery is one way to connect with your readers whilst hinting towards the storyline. It isn’t compulsory, but it’s a great way to catch your reader’s eye.

Take a look at this minimalistic cover for Against Happiness, written by Eric G. Wilson. The designer, Jennifer Carrow, plays on the traditional yellow acid smiley face to create the suggestion of a frowning face.
Use typography.
Your book cover doesn’t have to use detailed imagery to attract potential readers. Clever use of typography can be just as engaging and eye-catching, if not more so.

This designer’s take on the famous story of Jaws uses typography - the tip of the A in the title - to illustrate the shark’s fin. Simple, effective and eye-catching.
Use photography.
One way to avoid amateur graphic design is by using photography. You’ll still have to carefully consider your composition as well as the typography that goes with your image, but it may allow for a little more creativity if you aren’t confident graphic design.

This beautiful cover designed by Jason Ramirez uses photography to create a compelling cover that captures traditional still life to depict the early years of author Gabriel Marquez’s life, written by Ilan Stavans.
Choose a professional design.
If you’ve acquired the assistance of a graphic designer to create your book cover, lucky you! You can leave it to them. However, if you’re designing your cover yourself, you need to make sure the finished product still looks professional - and not amateur. Have a look at what’s out there, and try to feed what inspires you into your design. If you aren’t a graphic designer, it’s best to keep your cover as simple as possible.
Design for your genre.
What is the theme of your life? Is your story a suspense-filled thriller? Or is it brimming with romance? Whatever your genre, your book cover needs to fit its mood and style.
Romantic stories: if you’ve lived a life of romance, the traditional cover will show two people (the lovers in the story) connecting in some way. There are numerous different ways of showing this, so get creative, keeping in mind that romantic imagery tends to use softer : lilacs, pinks golds. This can be seen on the cover of Nicholas Sparks’ romantic novel, Dear John, notably conveying romance through two horses rather than people.

Mystery: for your mysterious story, play on perspective, don’t give everything away and focus on the title, with angular serif typefaces. Making what the potential reader is looking at somewhat unclear will add to the sense of mystery. These stark and edgy designs are commonly in high-contrast , with red to allude to danger. The Girl on the Train by Paula Hawkins uses typography on top of a blurred background to suitably convey the feeling of being on a train, whilst giving nothing else away. Mysterious.

Miscellaneous: none of the above quite fitting the bill? It’s difficult to pigeonhole the rest into specific themes because they are all so vastly different. Books, obviously, can vary extensively - as can book covers. These book covers don’t have anything in common, but they are all eye-catching, engaging and make the potential reader want to know more.
Write an engaging blurb.
Your captivating design has engaged the potential reader and done its job of getting your book into their hands. Now, all you need is a blurb that really hooks the reader, so they can’t just put it down! Like the cover, your blurb needs to reflect the tone of your book. If the blurb is funny, the reader will expect the book to be funny. Introduce the protagonist, the plot and then entice the reader with an emotional hook that alludes to the characters’ journeys and what they stand to gain or lose.
Give a sense of the story and tone in a clear and concise few paragraphs that are easy to read, and there’s no reason why the potential reader will put your book down until they’ve turned the last page!
these hints and tips have been helpful. Don’t be afraid to stray away from the conventional and come up with something different. Have a look through your book covers and see if you can incorporate any ideas you come across into your own cover.
Read Chapter 9: An Overview

Organising Your Memories
Organising your memories is the first step towards writing a memoir. Use our memory prompts and timeline to kick-start writing your memoir.
This is the first part of our 'Ultimate Guide to Writing a Memoir. 'To access the rest of the guide, click here.
Welcome to Story Terrace's ultimate guide to writing your memoir. We've helped hundreds of people to capture their life stories in beautiful books, written by our professional ghostwriters. Now we're sharing some of our expertise to help you along your journey.
You may be halfway through writing your memoir - or right at the beginning. Either way, you've probably found it a challenge to recall and organise all the memories that make up your life story.
To help, in this chapter we are sharing two resources: a set of 65 Memory Prompts we use with our customers to kick-start the process, and a Timeline Template you can then use to organise all the information.
You can access the two resources by following the link below:
Email Memory Prompts + Timeline template
We'll email you the memory prompts right away, and send you the timeline template once you've had some time to do the first exercise. If you want to access the timeline immediately you can find it here.
Using these resources
Memory prompts
Whether you are writing yourself, or working with a ghostwriter, it can be hard to know where to start and what to include. At Story Terrace, we often use memory prompts to kick-start the process - easy and fun questions designed to jog your memory and bring back moments you haven't thought about for years.
It's the perfect first step, and something you can later assemble into a timeline or structure for your story. We’ve hand-picked 65 of our favourite memory prompts to share with you.
Remember - you don't need to answer every question. Just scan through the list, and think about which of these prompts speak to you the most. You’ll soon find you have more than enough to talk about.
Timeline
If you’re writing a book about your life, creating a timeline is an essential step. While your story is based on your own experiences, it’s easy to forget important moments — unless it is all laid out clearly in front of you. A timeline provides clarity and structure for your life story.
Once you’ve gathered all the information you need, it’s time to start organising your memories by filling in your timeline.
Our timeline template is separated into 'key events' on the left, and 'connecting stories' on the right. Key events are the major tentpoles of your life story - so brainstorm those first (using our memory prompts as a starting point). Once you've filled those in, start fleshing out memorable stories and anecdotes from these periods in your life, in the 'connecting stories' section.
What you’ll come away with is a complete overview - making it easier to identify themes and get creative with your structure, which you can learn more about in the next chapter.
All done?
Congratulations, you’ve taken a big step towards writing your memoir. Your key events will help you to inform your decisions regarding chapters and structure, potentially becoming your chapter titles, with the details becoming your chapter content.
Want to take it to the next level?
If so - ask yourself, how do you feel about what’s in front of you? Are any themes starting to emerge? Try labelling or highlighting your timeline to bring out the common threads.

Editing and Proofreading Your Book
After you've written your memoir, you'll need to start editing and proofreading. Find out how to do both here.
Congratulations! You’ve written your book. All that’s left to do is make sure it all makes sense - and you’re ready to print. But where do you start? To many people, editing and proofreading are the same thing. This is a common misconception:
Editing comes first, after you’ve written your first draft. Editing is all about the actual content of the writing, and involves making sure your ideas are expressed logically, in a clear and coherent narrative. This article will tell you exactly how to edit your book.
Proofreading comes after the editing process, and is less about content, more about language. It involves checking over spelling, punctuation and grammatical errors, as well as format.
Before you edit:
We’re sure you’ll be thrilled to hear that the first step after you’ve written your story is, actually, to do nothing at all. Take a break! It’s a good idea to have some space from your writing so that when you do revisit, you’re able to read the story with fresh eyes.
Once you’re ready, before you change a word, read through the whole story. You will have been staring at your work, likely on a computer, or weeks or months. We recommend that you change the format for this first read-through. Try changing the typeface and font size to make the words less recognisable. If you can, print the whole thing out - so you can get out of the screen, and jot down some notes without actually changing anything. This also makes the manuscript easier to read. Of course, printing out an entire biography may not be possible, and some people do prefer to read on-screen, so do whatever suits you.
Whilst editing:
In terms of the editing process, the best way to approach your project is one step at a time. Ask yourself the following questions, and don’t be alarmed if it feels like you’ve got a lot of work ahead of you - editing can involve major changes or even a complete rewrite:
Does the opening paragraph clearly indicate the purpose of the text?
Is there a clear purpose throughout the text?
Is every sentence relevant to the purpose of the text?
Does each paragraph contain one idea?
Does the text flow logically?
Have you used a varied sentence structure and vocabulary?
Have you used an appropriate tone for your reader?
Does the last paragraph satisfyingly conclude the story?
After editing:
Take a break. Let someone else do the work for you! After you’ve edited your story, find a friend or family member that you trust to read through your book. Showing someone else your work and getting feedback is an important stage of the process, because it gives you an insight into what your audience might think of your book when it’s finished. Up until now, you’ve been the only person that’s read your story, and a fresh pair of eyes could point out a fundamental error that you might have missed, or amend part of a story you remembered incorrectly.
If you aren’t sure who to ask, or you don’t feel that anyone you know is suitable, why not ask a professional?

Before you proofread:
Have you finished editing? There’s no point in proofreading if you’re going to make further changes to the text or the structure of your book. It’s a good idea to design your book first, including photographs, layout and format, which you can find out more about in Chapter 7.
Next, establish what you’re looking for when you’re proofreading. What are your common mistakes? Make a list to stay focused when reading: spelling, punctuation and grammatical errors, as well as consistent use of language, style and formatting.
It is also advisable to take another break before you start proofreading, to distance you from the writing. Take a day, at least, to recuperate.
Whilst proofreading:
Reading out loud helps you spot errors and run-on sentences that reading silently risks missing. If you’d prefer, read from a printout, and use a blank sheet of paper to cover the lines below the one you’re reading to decrease your chances of missing mistakes. On-screen, use search functions to pick out common mistakes. For example, if you frequently confuse “it’s” and “its”, search ‘it’ to check for errors.
You’ve read your story for the final time, you’ve made all the relevant changes, and everything looks perfect! What else could you possibly have left to do?
Read Chapter 6: How To Digitise Your Photos

Designing and Printing Your Book
The design process is a crucial element of writing a memoir. If you choose the wrong layout and format or printing process, it could ruin your whole book.
This is the seventh part of our 'Ultimate Guide to Writing a Memoir.'To access the rest of the guide, click here.
In this chapter, you’ll learn everything you need to know about the design process. This includes:
- Layout and format
- Choosing a designer
- Printing your book
Layout and Format
You can design and format your own book - but we wouldn’t recommend it. This is because there are so many little things to think about, and so many big things you could forget. Leave it to the professionals!
If you would like to have a go yourself, here’s what you need to think about:
- What typeface do you want to use? Serif or sans serif?
- What size book do you want to end up with? A5? A4? Square?
- How many photos do you want to include?
- What’s going on the back cover - or the front cover? (We’ll get to that.)
And that’s just the tip of the iceberg.
Choosing a Designer
In terms of choosing a designer, make sure you check out their previous work and customer reviews to see if they’re really someone you want to work with. Are they experienced at typesetting and laying out a book? Have they got templates to work with? If not, it might be wise to steer clear.
At Story Terrace, in addition to our own templates, we can also create bespoke designs and custom covers to suit your project. We use the same trusted designers for every project - so we know what works, and what doesn’t - and you don’t have to worry about a thing.
Take a look at our sample books for inspiration.
Printing Your Book
It’s the final step. You’ve done all the hard work and now it’s time to reap the rewards by holding that physical copy of your book in your hands for the very first time. But what’s that? Your cover hasn’t aligned properly, and half the title has been cut off.
You may be close to the end, but you certainly don’t want to lose focus. Whilst the printing is largely out of your hands, you can make sure that you’ve done your research.
The cost of printing will depend on how many copies you order. Usually, the more copies you order, the cheaper the cost per book will be. Additionally, other contributing factors you might want to consider are whether you want a hardcover or softcover, full color or black and white book. Printers’ costs vary, so it’s worth getting a few quotes. Some printers won’t do short print runs (e.g., of 4 copies, like our printer does), so that’s also something you might want to think about. Equally, if you’re getting your books printed abroad, you’ll need to factor in the cost of shipping too.
Read Chapter 8: How To Make Your Book Cover Stand Out

Structure your Life Story
5 great ways to structure your life story or memoir.
Ultimate Guide to Writing a Memoir (Part 2)
Introduction
This is the second part of our 'Ultimate Guide to Writing a Memoir.'
To access the rest of the guide, click here.
Organizing Your Memories
So you've gathered everything you need to write your memoir. If you need more help, make sure you've read Chapter 1: Organising Your Memories, where you can download our Memory Prompt Cheat Sheet to uncover forgotten memories. But what comes next?
There are many ways to structure your memoir. There is no right or wrong way to do it, but it’s one of the biggest choices you will make about your book. Structure is crucial to the readability of your book. You might write beautifully, but without any kind of structure, your words will be scattered and disorganized.
So how do you structure your life story? We’ve outlined five of the best approaches to help you choose.
1. The Chronological Approach
One of the simplest ways to structure your life story and develop a narrative is chronologically—in the order that it happened. In this case, you’ll start at the beginning of your timeline and work your way through from birth to the present day. Writing chronologically facilitates fluid and realistic character development, and as a result, allows events to mirror the way your book will be read.

A surprising example of a chronological structure: Time’s Arrow by Martin Amis
Shortlisted for the Booker Prize in 1991, Martin Amis’ book is written in reverse chronological order. It follows the story of a doctor getting younger and younger as time passes in reverse. This disorienting narrative makes for an unsettling and irrational read and emphasizes the importance of deliberate structure within a book.
2. The Basic Three Act Structure
The Basic Three Act structure splits the narrative into three parts: the setup, confrontation, and resolution. It is one of the easiest ways to structure your life story.
- Setup: Introduces the characters, their relationships, and the environment they live in. It also presents a strong hook—an exciting incident that provokes a change in the protagonist's routine.
- Confrontation: Makes up the main bulk of your story. The stakes are raised throughout the act until a major twist, usually a moment of crisis, initiates the start of act three—the resolution.
- Resolution: Presents the final showdown and draws together and explains all the different strands of the plot.
A great example of the Basic Three Act structure: The Titanic by James Cameron
The setup introduces Rose, an unhappy woman engaged to a man she detests. Jack rescues her following her attempt to commit suicide. The confrontation sees the stakes raised when Rose’s fiancé begins to suspect their affair. In a moment of crisis, the famously unsinkable ship hits an iceberg. The resolution follows Rose and Jack as they try to escape the sinking Titanic, ultimately ending in Jack’s death and Rose’s survival. Rose recounts the series of events as an old woman as the story ends.
3. Freytag’s Pyramid
Freytag’s Pyramid is a more complex version of the Basic Three Act structure, with five parts rather than three. These are: exposition, rising action, climax, falling action, and resolution.
- Exposition: Introduces the characters and backdrop of the story.
- Rising Action: Follows the series of events that occur straight after the exposition and leads up to the climax.
- Climax: The turning point that changes the protagonist’s fate.
- Falling Action: The consequence of the climax, where the conflict between protagonist and antagonist unravels in a final moment of suspense.
- Resolution: Creates a sense of catharsis in conclusion to the story.
A great example of Freytag’s Pyramid: Little Red Riding Hood by Charles Perrault
The exposition introduces Little Red Riding Hood as she takes a basket of food to her grandmother’s house. Before she gets there, the wolf eats and takes on the identity of her grandmother. This is the rising action. The wolf convinces Little Red that he is her grandmother and eats her in the climax. In the falling action, the wolf falls asleep. The huntsman finds the wolf and cuts open his stomach. The resolution sees Little Red and her grandmother freed, and the wolf killed.
4. In Media Res
Latin for 'into the middle of things', it’s unsurprising that this structure starts your book right in the middle of the story. This is usually in the midst of a crisis or at a crucial point of action. This structure gives the reader a sense of what’s to come before reverting to the beginning of the story to find out how they got there. It’s also a great way to hook the reader from the first page.
A great example of in media res: The Odyssey by Homer
The famous poem opens in media res, with most of Odysseus’ journey already finished. Flashbacks and storytelling describe the events and characters met along the way.
5. The Hero’s Journey
One of the most popular methods used to structure your life story is the Hero's Journey. It was first conceptualized by Joseph Campbell in his book, The Hero With A Thousand Faces, and has since been adapted by Hollywood executive, Christopher Vogler. There are 12 stages to the Hero's Journey.
- Ordinary World: Introduces the hero.
- Call to Adventure: A challenge or problem.
- Refusal of the Call: The hero is reluctant to accept the adventure.
- Meeting a Mentor: Gives the hero confidence.
- Crossing the Threshold: The hero commits to the adventure.
- Tests, Allies, and Enemies: The hero faces challenges.
- Approach to the Innermost Cave: The hero draws closer to the goal.
- Ordeal: The hero faces a major crisis.
- Reward: The hero achieves the goal.
- The Road Back: The hero begins the journey home.
- Resurrection: The hero faces a final test.
- Return with the Elixir: The hero returns home changed and with new knowledge.
A great example of the Hero’s Journey structure: Star Wars directed by George Lucas
In the ordinary world, Luke Skywalker lives on a moisture farm on Tatooine. R2-D2 gives Luke a message from Princess Leia, asking Obi-Wan Kenobi to help her as the call to adventure. Obi-Wan gives Luke his father's lightsaber, but at first, Luke is reluctant to accept his offer in the refusal to call. In addition, Obi-Wan, the mentor, offers to train Luke to become a Jedi. Crossing the first threshold, Luke finally agrees to go with Obi-Wan to Alderaan to deliver the plans for the Death Star to Leia's father.
Han Solo and Chewbacca, their allies, agree to take Luke and Obi-Wan to Alderaan. In the approach to the innermost cave, the Death Star destroys Alderaan. They invade the Death Star and rescue Princess Leia, but Darth Vader kills Obi-Wan Kenobi in the ordeal. The reward sees Luke join the Rebels to destroy the Death Star, who also refuses Han Solo's offer to leave. Luke chooses to help overcome the Galactic Empire in the road back.
Luke remembers Obi-Wan's advice and destroys the Death Star using the Force in the resurrection, and wins a medal, finally taking his first steps towards becoming a Jedi in the return with the elixir.
At the end of the day, your story can be as structurally unpredictable as life itself. It’s your life and your story. We hope these methods have opened your minds to the vast possibilities and different forms your life story can take. But remember, there’s no right or wrong way to structure your life story: it’s up to you.
Read Chapter 3: Writing (the nitty gritty!)

Get to Know Your Parents - Before They Were Your Parents!
Three great ways to capture your parents' life stories for future generations of your family
How much do you really know?
So many of your parents' stories took place before you were born, or were old enough to understand. Your parents know your whole history – but chances are you only know a fraction of theirs.
As our parents get older, these stories start to become more important to us. We want to preserve their memories – we don’t want them to be lost.
However you choose to record your parents’ life stories, the first step is to start talking. So today, we’re sharing four great ways to get the ball rolling.
1. Picture this…
A lot of our customers find old photo albums a great place to start. Take a day to bring out the old family albums with mum or dad. You'll find that it jogs the memory, brings up stories you never even knew about, and it’s also a fantastic way to begin assembling material for a memoir or biography.
It’s also an opportunity to digitize old pictures, which we strongly recommend. Nowadays, we are overwhelmed with photos. But older photos, from our parents’ childhood years, are often few and far between. It’s very likely you have no ‘back up’ of these pictures – old film and prints are liable to get damaged and lost forever! For this very reason, these older photos are infinitely more precious.
Luckily, with advances in technology, it has become easier to preserve old photos. Pictures can be scanned and stored safely online so that precious memories are not lost. As an added bonus, they are then easy to reproduce in a memoir or photo book. You can do it yourself by downloading an app, using a nearby print shop, or purchasing your own scanner.
2. Be your own family’s archaeologist
If you’re really serious (and brave), it’s time to have a look around the attic. Familiar with the film, Titanic? A search for a precious necklace, missing in the depths of the Atlantic Ocean led to the discovery of something priceless: the timeless love story of Jack and Rose. It’s not just Hollywood fiction – objects can really tell stories!
There’s a reason historians spend time digging up old Roman pots – it says a lot about how people lived their lives. Material culture can be just as important for you as your family’s historian. Your mom or dad’s memory won’t be infallible – mementos from the past can be important in bringing those truly old tales back to the present.
‘Why do you always wear that necklace, Mom?’ ‘Well, I was 13 and I was walking to school one day….’
By examining your parents’ old possessions, you won't just jog their memory, but make the story come alive for yourself, too!
3. Take note!
Now you’ve got your parents talking, you’ll want to keep a pen and paper handy. The stories your parents and grandparents share can be important insights into the past.
Stories dating to a time before you were born:
‘I had to be evacuated during WW2, I can still remember the sounds of the air raid sirens.’
Realities that seem so contrary from modern life:
‘I got my first job at 11 and have worked ever since.’
Make sure to jot down these little bits of information. And don’t forget to ask questions - use our memory prompts if you need some inspiration! It's through your curiosity that their life stories can truly take form.
4. Get professional help from Story Terrace!
We would all love to personally record our parents’ life stories. But it often isn’t that easy. It can be difficult to find the time to finish a project. It’s also hard to be an expert interviewer and writer on the first attempt. And then you'll still need to transform all of that work into a readable format you can share with your family – which involves editing the text, and designing and printing everything yourself.
Story Terrace is here to help you capture your parents’ lives in a book. Our professional ghostwriters have extensive experience interviewing our customers’ parents and structuring their memoirs and biographies. We have in-house editors who manage the process end-to-end, and we know how to beautifully present precious memories in a way that will last.
If you’d like to inquire about our services, feel free to contact us.

How StoryTerrace matches you with your perfect ghostwriter!
Our 4 steps to match you with the perfect ghostwriter for your story.
Capture the memories of your loved ones
That book then can be an amazing resource
Congratulations! You’ve decided to create your very own, beautifully bound StoryTerrace book. Our professional ghostwriters will help you to make your life story the best it can be.
The next step is to find your writer. With the largest pool of specialist ghostwriters in the world, part of what makes StoryTerrace unique is our ability to pair you with the perfect biographer for you.
As our Managing Editor, Alice Nightingale, says, “we pride ourselves on matching our clients with their ghostwriters carefully.” That means you can rest assured, knowing that you'll be working with a writer who can capture your story, find your voice, and make the process relaxed and enjoyable.
But how?
This happens through StoryTerrace’s tried and tested method of ghostwriter selection. So, how does it work? The infographic below explains the step-by-step process we use.
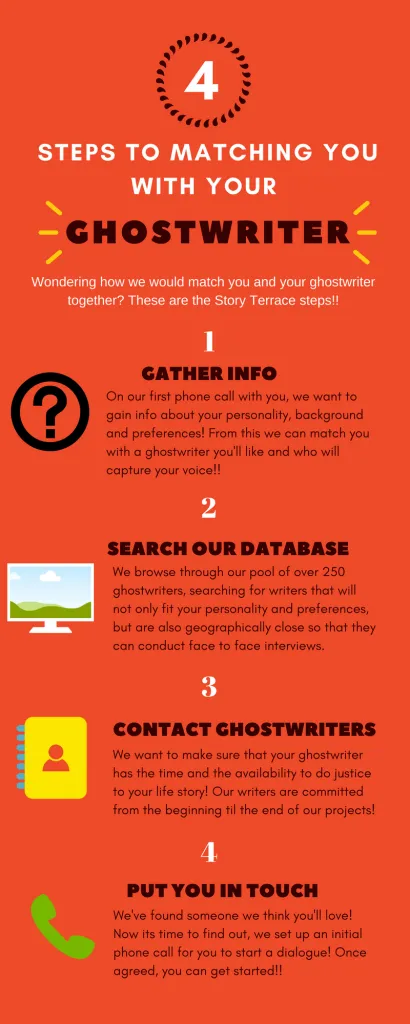
Step 1: Getting to know you
After you’ve decided to write your life story with StoryTerrace, you’ll have a brief consultation with your editor. We try to gather as much information as possible to ensure we find you the perfect fit.
“Everyone I spoke with at StoryTerrace was absolutely lovely and listened to all I had to say,” Isabella Matthews, StoryTerrace customer.
We want to know about your personality! For instance, matching you with someone who shares your sense of humour can help to build a rapport between you and your ghostwriter, making the writing process much more enjoyable.
At this stage, learning about your background is also extremely useful. It’s important that your writer understands you. When it comes to forging a mutual bond and finding your voice, a shared background or a common experience can make all the difference.
We also use this stage to ask about your preferences. We can accommodate most requests - whether it's something small - ‘I don’t want to work with someone that supports my rival football team’, or something more personal: ‘I would feel more comfortable sharing my experiences with someone of my own age’. Our goal is for customers and writers to feel comfortable, and create an atmosphere conducive to writing.
Step 2: Writer Search
StoryTerrace works with hundreds of professional journalists and authors - the largest pool of specialist ghostwriters in the world. That said - we know our writers like the back of our hands. Using the information from your consultation, your editor will propose ghostwriters who are a good fit for the project. Have a look at our writers’ profiles.
Additionally, we also consider your location. Interviews with your writer form the backbone of your story. We are almost always able to match customers with writers who are close enough to conduct the interviews in person, face-to-face. We think this makes the process more enjoyable, helping to develop a relationship between customer and ghostwriter, and making the end result more personal.


Step 3: Consult the ghostwriter
Next, we contact the top candidates for the job, and tell them about you and your project! It’s important for you to like your ghostwriter, and also for them to like you. If a mutual relationship flows, the final outcome becomes a labor of love.
It sounds obvious, but we also make sure that the writer is available for the duration of the project! You can read about the packages StoryTerrace offers here. For example, if you’ve purchased a Compact book package, your ghostwriter must be available for 3-4 hours of interviews and able to produce 5,500 words of your story. If you’ve paid for a Novella, the ghostwriter will carry out 8-10 hours of interviews and produce 20,000 words.
Whichever package you choose, the writer will be committed to the project from beginning to end, so we ensure you have the time together to tease out your life story!
“Sara really took the time to help me find the structure in the story of my life!” Teresa Samuels, StoryTerrace customer.
Step 4: Getting in contact
Hurrah, we’ve found your match! Now it’s time to put the two of you in contact.
You will have an initial phone call with your writer to make sure you’re happy with the match. This is an important opportunity to really discuss what you want the book to be about. Even at this stage, if you aren’t happy – you can choose a different writer. Writing your life story with StoryTerrace is, from beginning to end, a collaborative effort.
“Initially, we chatted on the phone and Lisa made it clear from the outset that if we didn’t ‘hit it off’ she would bow out gracefully and I could choose another writer”. David Taylor, StoryTerrace customer
So there it is, the secret to finding your perfect ghostwriter! If you’re ready to get started, contact us to begin your StoryTerrace experience today!


